How to Perform the ASUS ROG Rapture GT-BE98 Setup Within Minutes?

In the world of gaming, a stable & fast internet connection is what we require for a smooth online experience. That’s where the ASUS ROG Rapture GT-BE98 Pro Gaming Router comes in. With its advanced features and gaming-centric design, it is tailored for gamers who demand the best from their network. This blog will guide you through the ASUS ROG Rapture GT-BE98 Setup process, ensuring you maximize the potential of your router. Keep reading this post!
Getting Started: Unboxing the ASUS ROG Rapture GT-BE98 Pro Gaming Router
Primarily, when you buy this gaming router, unbox it carefully. Unpack all accessories that come with your router. Additionally, you will find a power adapter, an Ethernet cable, and a quick start guide. Then, you must look for a suitable location to place the ASUS ROG Rapture GT-BE98 Pro Gaming Router for optimal Wi-Fi coverage.
After unboxing your router, you must now collect the required things. For a seamless ASUS ROG Rapture GT-BE98 Setup, you must have an active internet connection, an accurate web/IP address, login credentials, the Asus Router app, a compatible device, etc. After that, you are all set to set up your Asus gaming router.
Initiating the ASUS ROG Rapture GT-BE98 Setup
When you have all the required things in hand, you should now go ahead with the hardware connections. Additionally, you should also know the most preferred and available ways to set up your ASUS ROG Rapture GT-BE98 Pro Gaming Router. So, here are the quick steps to set up your Asus GT-BE98 router.
- Initially, unplug your existing modem if you have one.
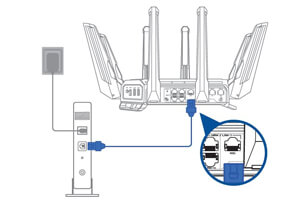
- Next, connect the router to your modem using the included Ethernet cable.
- Plug one end into the WAN port on the router and the other into your modem
- After that, plug in the power adapter and switch on the router.
- Wait a few moments until the LED indicators stabilize, indicating that the router is ready for configuration.
- Now, connect your computer to the default Asus wifi network.
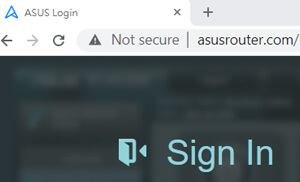
- Next, launch any web browser on your computer and visit the asusrouter.com web GUI.
- Then, create a strong & unique password for your router.
- After that, the QIS-smart wizard of the router appears.
- Now, your router will detect your “Internet Connection” type automatically.
- Further, navigate to Advanced Settings>Wireless and configure the wifi settings.
- Apply these changes and go to “General Settings”.
- Here, you can enable Parental Controls, AiMesh, VPN, etc., and other general and advanced settings.
- Finally, review all settings and apply the changes.
- Now, the ASUS ROG Rapture GT-BE98 Setup is finished.
Important Note: Now, you can easily set up your Asus gaming router via the Asus Router app. Its user-friendly interface allows you to access and configure your devices with simple clicks or even through voice prompts with the latest voice assistant technologies.
Final Words
Overall, the ASUS ROG Rapture GT-BE98 Setup is a fundamental step for making the most of your wifi router. Indeed, it is a straightforward process and enhances your overall gaming experience. By following our quick guide, you can optimize your network performance and secure your network connections within minutes. If you are interested in learning how to set up your router via the app, then visit our website.